How to Diamond Paint Step-by-Step
How to Diamond Paint Step-by-Step
Your beginner-friendly guide to sparkling success ✨
So, you’ve got your first diamond painting kit—exciting! But now you’re wondering, “Where do I even start?” Don’t worry. Whether you're new to the craft or just need a refresher, this step-by-step guide will walk you through the entire process—from unboxing to display.
Let’s turn that blank canvas into a glittering masterpiece!
🧰 Step 1: Unbox Your Kit
Your Drill&Reveal kit includes everything you need:
- A pre-printed, adhesive canvas
- Packs of resin drills (aka diamonds)
- A diamond applicator pen
- Wax pad
- Grooved tray
[Insert Image: Neatly arranged unboxed kit contents]
📄 Step 2: Flatten Your Canvas
Gently unroll your canvas and lay it flat on a clean surface. You can place a book or two on the edges or let it rest overnight to help it fully flatten out.
[Insert Image: Canvas being flattened or placed under books]
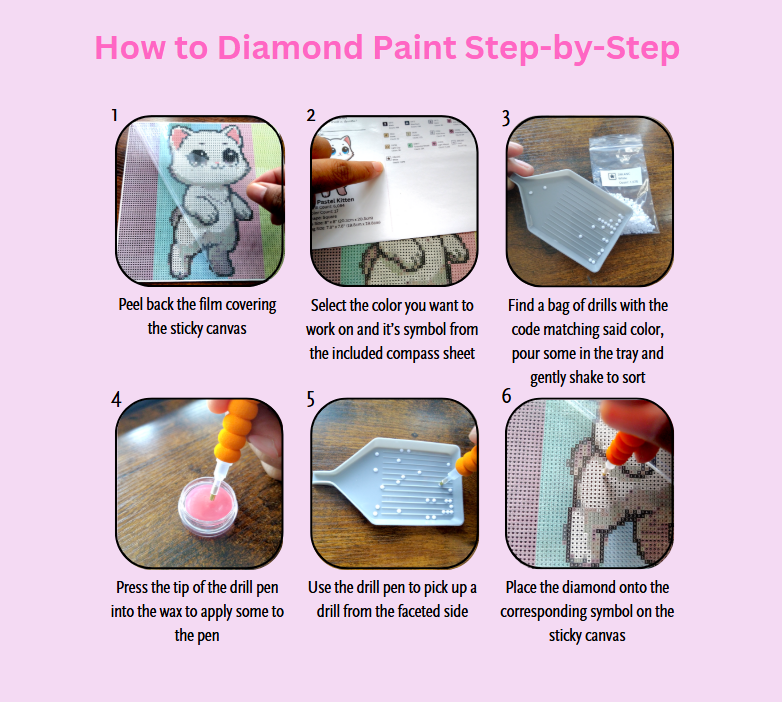
✂️ Step 3: Peel Back the Protective Film
The canvas is covered with a clear plastic sheet to protect the sticky surface. Peel it back just a few inches at a time—never all at once! This keeps the adhesive clean and tacky while you work.

🔍 Step 4: Match Symbols to Diamonds
Look at the symbols on your canvas. Each one corresponds to a color-coded drill bag. Use the chart printed on the side of your canvas (also called the "legend") to match symbols to drill numbers.
[Insert Image: Close-up of the canvas legend and a matching drill bag]
🪄 Step 5: Pour and Shake
Pour a small amount of your chosen drills into the tray and give it a gentle shake. The drills will flip right side up and line up in the grooves, ready for picking.

🖊️ Step 6: Wax the Pen & Start Placing
Press your pen into the wax pad to fill the tip. Then, pick up a diamond and press it onto the matching symbol on the canvas. That satisfying click means it’s locked in place!

🧩 Step 7: Work in Small Sections
It’s best to work on one area at a time. Use washi tape or parchment paper to section off your canvas, and only peel the film back as needed. This keeps your canvas sticky and easy to manage.
[Insert Image: Canvas divided into small working sections]
🎉 Step 8: Finish & Press
Once every symbol is covered in diamonds, give your canvas a gentle press using a book, rolling pin, or brayer. This helps secure the drills for long-lasting sparkle.
[Insert Image: Pressing down finished painting with a book or brayer]
🖼️ Step 9: The Extra Kick
If you're not completely happy with irregular gaps between your drills, brush on some of our mica powder to make those gaps disappear! Optional: you can seal it with a clear sealer if you want extra protection, especially if it’ll be displayed without glass.
[Insert Image: Painting the finished diamond painting with mica dust]
🖼️ Step 10: Show It Off!
Frame it, hang it, or gift it—your masterpiece deserves to be seen!
[Insert Image: Framed finished diamond painting hanging on a wall]
That’s It!
You’ve officially completed your first diamond painting! 🥳 Now that you’ve mastered the basics, the only thing left to do is pick your next project.
Stay tuned for more tutorials, tips, and inspiration on the Drill&Reveal Diamond Painting Blog—and don’t forget to tag us if you share your sparkle online!